Instant Pot Snow Skin Mooncakes with Coconut Mung Bean Filling Recipe – Bánh Dẻo Trung Thu

September 29, 2020Van
Blog post

Prep time: 4 hours

Cook time: 38 minutes

Serves: ≈ 26 Small 50g Moon Cakes

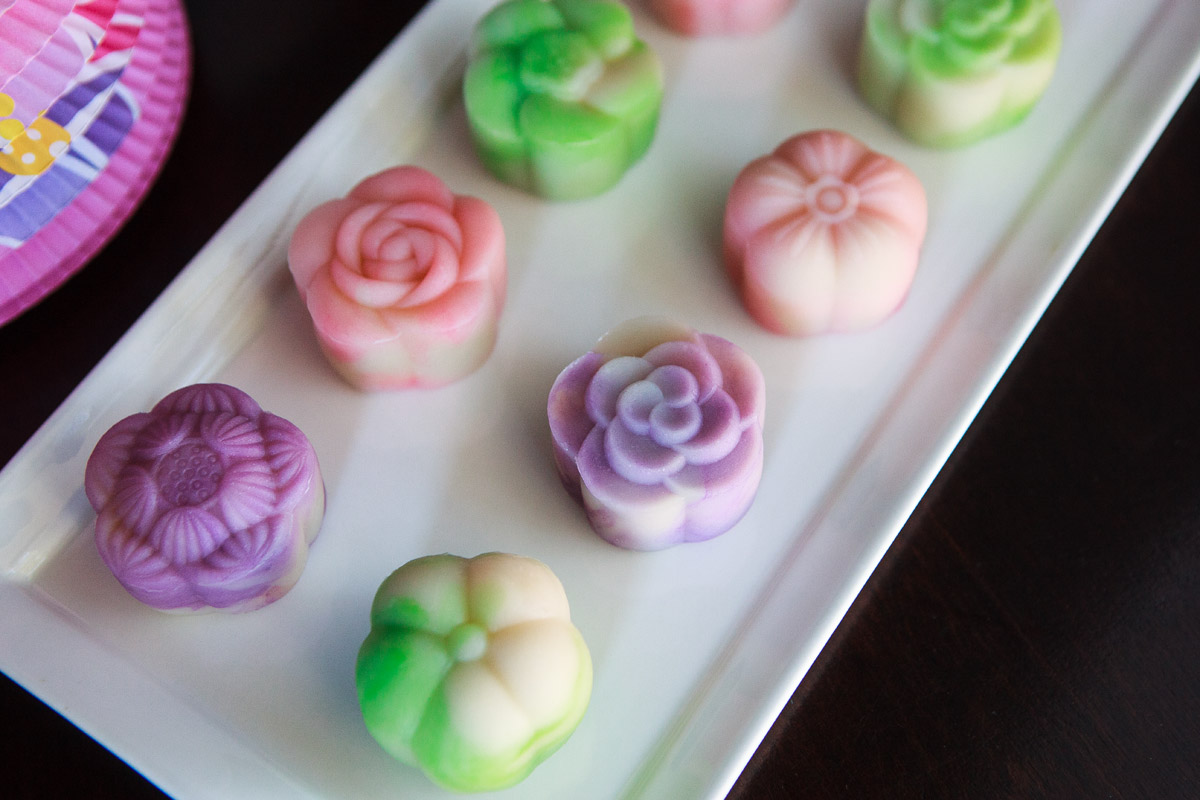
Tết Trung Thu or Mid-Autumn Festival is an ancient festival considered “children’s day” in Vietnamese culture. It falls on the 15th day of the eighth month in the lunar calendar, which is in September or early October – this year it lands on October 1, 2020 when the fullest moon will appear.  It’s day to celebrate the harvest, spend quality time with your kids – spoiling them with toys, their favorite foods, paper lanterns & treats such as mooncakes. I’m sharing my Instant Pot recipe for Bánh Dẻo Trung Thu / Snow Skin Mooncakes, the mooncake wrapper is soft and chewy (similar to mochi) with a sweet coconut flavored mung bean filling.

Instant Pot Snow Skin Mooncakes with Mung Bean Filling Recipe - Bánh Dẻo Trung Thu

Instant Pot Snow Skin Mooncakes with Mung Bean Filling Recipe - Bánh Dẻo Trung Thu

Instant Pot Snow Skin Mooncakes with Mung Bean Filling Recipe - Bánh Dẻo Trung Thu

Instant Pot Snow Skin Mooncakes with Mung Bean Filling Recipe - Bánh Dẻo Trung Thu

Use a kitchen scale to measure out the ingredients (purchase here)Instant Pot Snow Skin Mooncakes with Mung Bean Filling Recipe - Bánh Dẻo Trung Thu

You’ll need a set of 50g Mooncake Molds, purchased hereInstant Pot Snow Skin Mooncakes with Mung Bean Filling Recipe - Bánh Dẻo Trung Thu

Instant Pot Snow Skin Mooncakes with Mung Bean Filling Recipe - Bánh Dẻo Trung Thu

Instant Pot Snow Skin Mooncakes with Mung Bean Filling Recipe - Bánh Dẻo Trung Thu

Instant Pot Snow Skin Mooncakes with Mung Bean Filling Recipe - Bánh Dẻo Trung Thu

Instant Pot Snow Skin Mooncakes with Mung Bean Filling Recipe - Bánh Dẻo Trung Thu

Instant Pot Snow Skin Mooncakes with Mung Bean Filling Recipe - Bánh Dẻo Trung Thu

Instant Pot Snow Skin Mooncakes with Mung Bean Filling Recipe - Bánh Dẻo Trung Thu

Instant Pot Snow Skin Mooncakes with Mung Bean Filling Recipe - Bánh Dẻo Trung Thu

Instant Pot Snow Skin Mooncakes with Mung Bean Filling Recipe - Bánh Dẻo Trung Thu

Be sure to click on the accessories list below to get the most out of your Instant Pot.
Best Instant Pot Accessories List

Print Recipe

Instant Pot Snow Skin Mooncakes with Coconut Mung Bean Filling Recipe - Bánh Dẻo Trung Thu

  • Prep time: 4 hours
  • Cook time: 38 minutes
  • Serves: ≈ 26 Small 50g Moon Cakes

www.foodisafourletterword.com

Ingredients

Snow Skin Wrapper

  • 100 grams Sweet / Glutinous Rice flour
  • 95 grams Rice Flour
  • 45 grams All Purpose Flour
  • 115 grams Granulated Sugar
  • 400 ml Can of Coconut Milk (400g)
  • 2 Tablespoons Virgin Coconut Oil
  • ⅓ Cup Potato or Corn Starch for dusting

Mung Bean Filling

  • 1 Cup Split Yellow Mung Beans (215g)
  • 2 Cups Water
  • ½ Cup Granulated Sugar (100g)
  • ⅓ Cup Virgin Coconut Oil
  • 1 Teaspoon Coconut Extract

Special Supplies

Method

  • 1)

    In a large bowl, add 95g Sweet Rice flour, 100g Rice Flour, 45g All Purpose Flour, 115g Granulated Sugar and stir well with a whisk. Add 400ml Can of Coconut Milk, 2 Tablespoons Virgin Coconut Oil and stir very well until the batter is smooth and there are no lumps. Pour the batter into a 7 inch Cake Pan, place a paper towel on top of the pan, use 2 large pieces of foil that can wrap the pan completely (should wrap down to the bottom of the pan). Pour 1½ Cups of Water into the Instant Pot, use a silicone sling or trivet and place the cake pan on top. Seal the lid, choose High Pressure for 25 Minutes, once the timer is up, immediately switch the knob to venting, when the pin drops open the lid. Carefully remove the pan and remove the foil and paper towel.

  • 2)

    Use a spatula and stir and knead the dough for about 2 minutes. If you plan on making just 1 color, add your food coloring now, a little goes a long way, so add a little at a time and knead with a spatula until the color is even. If you want a marble effect like my moon cakes, split the dough in half – half of the dough will remain white/uncolored. The other half can be split again if you want to do multiple colors. I did 3 colors, so I split dough into thirds and colored the dough. Let it cool to lukewarm then wrap up each color separately with plastic wrap and refrigerate for about 4 hours (or longer) – the dough will feel much firmer, test the dough before using, it should not feel sticky.

  • 3)

    Rinse the mung beans once and drain the water. Pour 2 Cups of Water into the Instant Pot, add 1 Cup of the rinsed Mung Beans (*Optional: add 1 drop of orange food gel for a more vibrant color). Stir and even out the mung beans, seal the lid, choose High Pressure for 13 minutes, when the timer is up, wait 10 minutes before switching the knob to venting – once the pin drops, open the lid. Place the cooked mung beans into a food processor, add ½ Cup Granulated Sugar, ⅓ Cup Virgin Coconut Oil and 1 Teaspoon Coconut Extract. Process for about 2 minutes – it should look smooth. Pour into a bowl, once it cools to lukewarm, cover with plastic wrap and refrigerate for about 2 hours. This will firm up a lot in fridge.

  • 4)

    When you’re ready to make the moon cakes, remove the mung bean mixture from the fridge. Measure out 25g of mung bean for each cake, I used a 1½ Tablespoon scooper and it scoops exactly 25g – roll into balls an place on a silicone mat or parchment paper.

  • 5)

    Remove the wrapper dough from the fridge, if you made 1 color, use a kitchen scale and measure out 25g for each moon cake. If you are doing the marble effect, use half white dough and half colored dough so they measure out to be 25g. Dust your hands lightly with corn starch, then fold the dough 1 or 2 times to mix the colors a little. Use your hands & fingers to flatten out the dough into a small circle, place the mung bean into the center and fold up the dough and pinch the ends to seal it up. Roll it in your hands to make a ball, this will help smooth out the seams, add a very light coating of corn starch to the outside so it doesn’t stick, then form it into an egg shape so it can fit into the moon cake mold.

  • 6)

    Place into the moon cake mold, hold the mold firmly on your work surface, then press the mold down 3 times then remove the moon cake – you can add a little more starch to the bottom of the cake so it doesn’t stick to the plate. Repeat until you’ve made all the moon cakes. The wrapper dough needs to remain cold to be workable, if it starts to feel sticky, it’s getting too warm, wrap it up and place it back into the fridge for 30 minutes before using it again. Place the snow skin moon cakes into a tupperware container and refrigerate for about 2-3 hours before serving so it firms up slightly. If you want to serve it the next day, you can refrigerate it overnight, just let it sit out for about 10 minutes before serving. These are best eaten within 1-2 days – the skin dries out quickly after that. Happy Mid-Autumn Festival!

Notes


2 Comments

  • Hanh

    August 20, 2021 at 3:08 pm

    Can you replace the all purpose flour with something else to make this mooncake gluten free in your recipe? My child is allergic and would love have him try this since he can’t have the traditional ones. Thanks for all your great recipes

    1. Van

      August 21, 2021 at 11:25 am

      Hi Hanh, I think you should use gluten free all purpose flour, you can find it at WholeFoods or Sprouts

Leave a comment

Your email address will not be published. Required fields are marked *

Previous Recipe Next Recipe