Snow Skin Mooncakes with Sweet Red Bean Filling Recipe

August 3, 2022Van
Blog post

Prep time: 30 minutes

Cook time: 1 hour

Serves: 16 Rice Cakes

I made these beautiful flower-shaped rice cakes filled with sweet red bean paste for the Qixi Festival (Chinese Valentine’s Day 七夕).  These rice cakes look complex, but they’re actual simple to make with the help of a mooncake mold. These rice cakes are also known as Snow Skin Mooncakes, so save this recipe to use next month for the Mid-Autumn Festival as well! If you’ve never tried these, they’re similar to mochi, but the wrapper is made with a few different types of flours and isn’t as squishy in order to hold it’s shape.  *Watch my Instagram Recipe Video here

I used Wei-Chuan Red BeansRice Cakes with Sweet Red Bean Filling Recipe (Snow Skin Mooncakes)

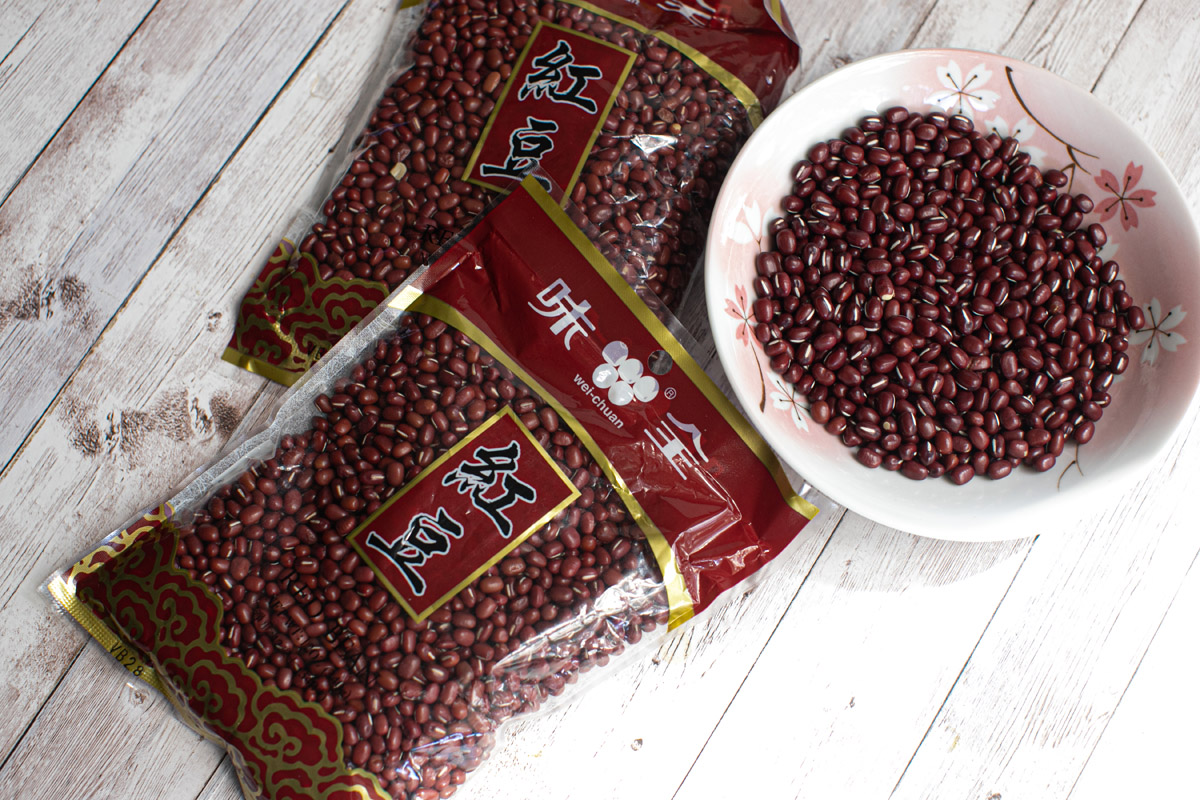
You’ll need a kitchen scale to measure out the red beans and wrapper to ensure each cake is consistent in size and so it’s the perfect size to fit into the mold.  24 grams for the sweet red bean paste & 26 grams for the wrapperRice Cakes with Sweet Red Bean Filling Recipe (Snow Skin Mooncakes)

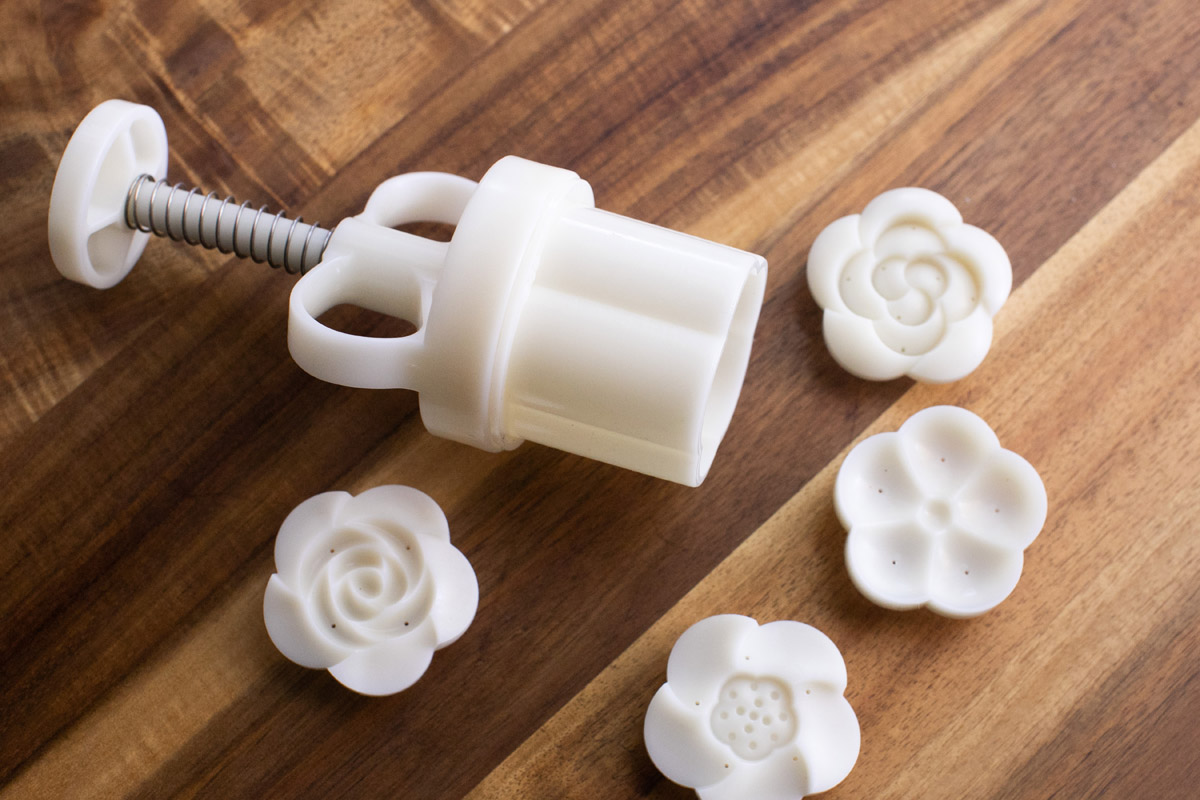
You’ll need these Flower Mooncake Molds to shape the rice cakes
Rice Cakes with Sweet Red Bean Filling Recipe (Snow Skin Mooncakes)

Rice Cakes with Sweet Red Bean Filling Recipe (Snow Skin Mooncakes)

Rice Cakes with Sweet Red Bean Filling Recipe (Snow Skin Mooncakes)

Rice Cakes with Sweet Red Bean Filling Recipe (Snow Skin Mooncakes)

Rice Cakes with Sweet Red Bean Filling Recipe (Snow Skin Mooncakes)

Print Recipe

Snow Skin Mooncakes with Sweet Red Bean Filling Recipe

  • Prep time: 30 minutes
  • Cook time: 1 hour
  • Serves: 16 Rice Cakes

www.foodisafourletterword.com

Ingredients

Sweet Red Bean Paste

  • 1 Cup Red Beans
  • ¾ Cup Brown Sugar, packed
  • 6 Tablespoons Butter

Rice Cake Wrapper

  • ½ Cup Sweet Rice Flour
  • ½ Cup Rice Flour
  • ½ Cup All Purpose Flour
  • ½ Cup Granulated Sugar
  • 1½ Cups Milk
  • 3 Tablespoons Oil
  • Cornstarch, for dusting
  • 50g Flower Mooncake Molds

Method

  • 1)

    STOVETOP METHOD: Soak 1 Cup of Red Beans in water overnight. Bring a large pot of water to boil, then simmer the beans for 60-90 minutes until the beans are soft and easily mashed. Drain well.

    
PRESSURE COOKER METHOD: No need to soak the beans prior to cooking. Pour 4 Cups Water and 1 Cup Red Beans into an electric pressure cooker. Seal the lid and set for 35 Minutes High Pressure. When the timer is up, immediate vent to release the steam. Once the pin has dropped, open the lid. Drain beans & discard the water.

    *Watch my Instagram Recipe Video here

  • 2)

    Immediately place the beans into a food processor and blend until smooth. *Optional, press through a mesh strainer to remove the bean skins. Pour into a pan, add 6 Tablespoons Butter, ¾ Cup Brown Sugar and use medium heat and stir constantly for about 10-15 minutes. Taste and add more sugar if you prefer it sweeter. It will start off looking very loose and shiny, towards the end, it will look darker and texture should be like thick brownie batter. Set aside to cool completely, cover and refrigerate for 2 hours before using.

  • 3)

    Make the wrapper dough: Use a mixing bowl, add ½ Cup Sweet Rice Flour, ½ Cup Rice Flour, ½ Cup All Purpose Flour, ½ Cup Granulated Sugar, 1½ Cup Milk, 3 Tablespoons Oil, you can also add a few drops of food coloring and stir until smooth.

    STOVETOP METHOD: Cover bowl with plastic wrap, Steam for 20 using medium high heat, the dough should look solid. Use a spatula and stir and knead the dough for about 2 minutes. Let it cool to lukewarm then wrap with plastic wrap and refrigerate for about 4 hours (or longer) – the dough will feel much firmer, test the dough before using, it should not feel sticky.


    PRESSURE COOKER METHOD: Pour the batter into a 7 inch Cake Pan, place a paper towel on top of the pan, use 2 large pieces of foil that can wrap the pan completely (should wrap down to the bottom of the pan). Pour 1½ Cups of Water into the pressure cooker, use a silicone sling or trivet and place the cake pan on top. Seal the lid, choose High Pressure for 20 Minutes, once the timer is up, immediately switch the knob to venting, when the pin drops open the lid. Carefully remove the pan and remove the foil and paper towel. Use a spatula and stir and knead the dough for about 2 minutes. Let it cool to lukewarm then wrap up with plastic wrap and refrigerate for about 4 hours (or longer) – the dough will feel much firmer, test the dough before using, it should not feel sticky.

  • 4)

    When you’re ready to make the rice cakes, remove the sweet red bean paste from the fridge. Measure out 24g of red beans for each cake, roll into balls and place on a silicone mat or parchment paper.

  • 5)

    Remove the rice dough from the fridge, measure out 26g of dough for each rice cake. Using vinyl gloves is a must since it prevents the dough from sticking to your hands. Use your hands & fingers to flatten out the dough into a small circle, place the red bean paste into the center and fold up the dough and pinch the ends to seal it up. Roll it in your hands to make a ball, this will help smooth out the seams, add a very light coating of corn starch to the outside so it doesn’t stick, then form it into an egg shape so it can fit into the flower mooncake mold.

  • 6)

    Place into the mooncake mold, hold the mold firmly on your work surface, then press the mold down 3 times then remove the rice cake – you can add a little more starch to the bottom of the cake so it doesn’t stick to the plate. Repeat until you’ve made all the rice cakes. Dust off any excess starch with a pastry brush. You can serve immediately or refrigerate them in a sealed tupperware container. Let them sit out for about 15-20 minutes before serving. These are best eaten within 3 days – the skin dries out quickly after that. Enjoy!

↓ Supplies to make this recipe ↓


Leave a comment

Your email address will not be published. Required fields are marked *

Previous Recipe Next Recipe